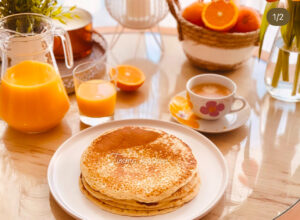
Semolina Pancakes (Baghrir) Recipe

Semolina Pancakes (Baghrir) Recipe

Semolina pancakes, also known as Baghrir or “thousand-hole pancakes,” are a traditional North African treat. These light, spongy pancakes are perfect for breakfast or tea, often served with honey and butter.


Ingredients

For the Pancakes:

  • 2 cups (250g) fine semolina
  • 1/2 cup (60g) all-purpose flour
  • 1 tsp baking powder
  • 1/4 tsp salt
  • 2 1/2 cups (600ml) lukewarm water
  • 1 tbsp granulated sugar
  • 1 tsp instant yeast

For Serving:

  • Honey
  • Melted butter
  • Optional: Jam or almond butter

Instructions

1. Prepare the Batter:

  1. In a blender or large bowl, combine the semolina, flour, baking powder, salt, sugar, yeast, and lukewarm water.
  2. Blend or whisk until the batter is smooth and lump-free. It should have a slightly runny consistency.
  3. Cover the batter and let it rest for 30–45 minutes in a warm place until bubbles form on the surface.

2. Cook the Pancakes:

  1. Heat a non-stick skillet or griddle over medium heat. Do not grease the pan.
  2. Pour a ladleful of batter into the center of the pan, spreading it slightly with the back of the ladle to form a circle.
  3. Cook the pancake on one side only, allowing bubbles to form and pop on the surface. Once the pancake is set and the surface is no longer wet, remove it from the pan.
  4. Repeat with the remaining batter.

3. Serve:

  • Stack the pancakes and drizzle with a mixture of melted butter and honey.
  • For a variation, serve with jam, chocolate spread, or almond butter.

Tips:

  • Use fine semolina for the best texture. If only coarse semolina is available, blend it before making the batter.
  • Do not flip the pancakes; they should cook on one side only.
  • To keep them warm, cover with a clean kitchen towel while cooking the rest.

These semolina pancakes are soft, spongy, and ideal for soaking up sweet toppings. Enjoy them warm with your favorite accompaniments! 🥞🍯✨

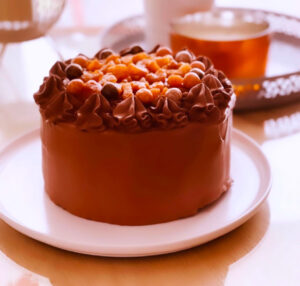
The Best Chocalate Layer Cake

The Best Chocolate Layer Cake Recipe

This chocolate layer cake is rich, moist, and absolutely decadent. Paired with a creamy chocolate frosting, it’s perfect for birthdays, celebrations, or whenever you’re craving chocolate! 🍫🎂


Ingredients

For the Cake:

  • 2 cups (250g) all-purpose flour
  • 3/4 cup (75g) unsweetened cocoa powder
  • 2 cups (400g) granulated sugar
  • 2 tsp baking powder
  • 1 1/2 tsp baking soda
  • 1 tsp salt
  • 1 cup (240ml) buttermilk, room temperature
  • 1/2 cup (120ml) vegetable oil
  • 2 large eggs, room temperature
  • 2 tsp vanilla extract
  • 1 cup (240ml) hot coffee (or hot water)

For the Chocolate Frosting:

  • 1 cup (225g) unsalted butter, softened
  • 3 1/2 cups (450g) powdered sugar
  • 3/4 cup (75g) unsweetened cocoa powder
  • 1/2 tsp salt
  • 1/2 cup (120ml) heavy cream, plus more if needed
  • 1 tsp vanilla extract

Instructions

1. Make the Cake:

  1. Preheat your oven to 350°F (175°C). Grease and line two 9-inch (23cm) round cake pans with parchment paper.
  2. In a large mixing bowl, sift together the flour, cocoa powder, sugar, baking powder, baking soda, and salt.
  3. In a separate bowl, whisk the buttermilk, vegetable oil, eggs, and vanilla extract until smooth.
  4. Gradually add the wet ingredients to the dry ingredients, mixing until combined.
  5. Slowly stir in the hot coffee or hot water. The batter will be thin, but this is normal—it ensures a moist cake.
  6. Divide the batter evenly between the prepared cake pans.
  7. Bake for 30–35 minutes, or until a toothpick inserted in the center comes out clean.
  8. Allow the cakes to cool in the pans for 10 minutes, then transfer them to a wire rack to cool completely.

2. Make the Chocolate Frosting:

  1. In a large bowl, beat the softened butter on medium speed until creamy (about 2 minutes).
  2. Sift in the powdered sugar and cocoa powder, then beat on low speed until combined.
  3. Add the salt, heavy cream, and vanilla extract. Beat on medium-high speed until the frosting is smooth and fluffy. Add more cream if needed to reach your desired consistency.

3. Assemble the Cake:

  1. Level the cake layers if needed by trimming the tops with a serrated knife to make them flat.
  2. Place one cake layer on a serving plate or cake stand. Spread a generous layer of frosting on top.
  3. Place the second cake layer on top, then frost the top and sides of the cake.
  4. Smooth the frosting with an offset spatula for a clean look or create swirls for texture.

4. Decorate (Optional):

  • Garnish with chocolate shavings, sprinkles, or fresh berries for an extra touch.
  • Drizzle with chocolate ganache for a luxurious finish.

Tips for Success:

  • Room Temperature Ingredients: Ensure the buttermilk, eggs, and butter are at room temperature for smoother mixing.
  • Coffee Boost: The coffee enhances the chocolate flavor but doesn’t make the cake taste like coffee. Use hot water if you prefer.
  • Storage: Store the cake in an airtight container at room temperature for up to 2 days or refrigerate for up to a week.

This chocolate layer cake is guaranteed to impress and satisfy any chocolate lover. It’s pure indulgence in every bite! 🍫✨

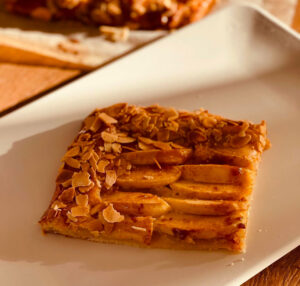
Almond Apple Tarts

Almond Apple Tarts Recipe

These almond apple tarts are a perfect balance of buttery crust, sweet almond filling, and tender apple slices. They’re easy to make yet elegant enough for special occasions! 🍎🥧


Ingredients

For the Tart Crust:

  • 1 1/4 cups (160g) all-purpose flour
  • 1/2 cup (115g) cold unsalted butter (cut into cubes)
  • 2 tbsp granulated sugar
  • 1/4 tsp salt
  • 2–3 tbsp ice-cold water

For the Almond Cream (Frangipane):

  • 1/2 cup (115g) unsalted butter (softened)
  • 1/2 cup (100g) granulated sugar
  • 1 large egg
  • 1 cup (100g) almond flour
  • 1 tbsp all-purpose flour
  • 1 tsp vanilla extract
  • 1/4 tsp almond extract (optional)

For the Apple Topping:

  • 2 medium apples (e.g., Granny Smith, Honeycrisp, or Gala), thinly sliced
  • 1 tbsp lemon juice (to prevent browning)
  • 2 tbsp granulated sugar
  • 1/2 tsp ground cinnamon

For Garnish (Optional):

  • Powdered sugar
  • Slivered almonds
  • Apricot jam (for glazing)

Instructions

1. Make the Tart Crust:

  1. In a food processor, pulse the flour, sugar, and salt until combined. Add the cold butter cubes and pulse until the mixture resembles coarse crumbs.
  2. Gradually add the ice water, 1 tablespoon at a time, pulsing just until the dough comes together.
  3. Form the dough into a disk, wrap it in plastic wrap, and refrigerate for at least 30 minutes.

2. Prepare the Almond Cream (Frangipane):

  1. In a bowl, cream the softened butter and sugar together until light and fluffy.
  2. Add the egg and mix well.
  3. Stir in the almond flour, all-purpose flour, vanilla extract, and almond extract (if using) until smooth. Set aside.

3. Prepare the Apples:

  1. Toss the apple slices with lemon juice to prevent browning.
  2. Mix the sugar and cinnamon in a small bowl, then sprinkle over the apples.

4. Assemble the Tarts:

  1. Preheat your oven to 375°F (190°C).
  2. Roll out the chilled dough on a lightly floured surface and cut it into circles to fit your tart pans (or use one large tart pan). Press the dough into the pans and trim the edges.
  3. Spread a layer of almond cream evenly over the crust.
  4. Arrange the apple slices on top of the almond cream in a fan or spiral pattern.

5. Bake the Tarts:

  1. Place the tarts on a baking sheet and bake for 25–30 minutes (for small tarts) or 35–40 minutes (for a large tart), until the crust is golden and the apples are tender.
  2. Let the tarts cool slightly.

6. Glaze and Garnish (Optional):

  1. Warm the apricot jam slightly and brush it over the apples for a glossy finish.
  2. Sprinkle with powdered sugar and slivered almonds for extra elegance.

Tips:

  • Apple Variety: Use tart apples like Granny Smith for a contrast to the sweet almond cream, or sweet apples for a milder flavor.
  • Storage: Store the tarts in an airtight container at room temperature for up to 2 days.
  • Shortcut: Use store-bought tart shells to save time.

Enjoy these almond apple tarts as a beautiful and delicious dessert or tea-time treat! 🍎🥧✨

Moroccan Seafood Pastilla

Moroccan Seafood Pastilla Recipe

Moroccan seafood pastilla (or bastilla) is a decadent dish that combines layers of crispy, flaky pastry with a rich, savory filling of seafood and aromatic spices. A showstopper for special occasions! 🥮🦐🐟


Ingredients

For the Filling:

  • 500g (1 lb) shrimp (peeled and deveined)
  • 300g (10 oz) white fish fillet (e.g., cod or halibut), cut into small pieces
  • 300g (10 oz) squid or calamari, cleaned and chopped
  • 1 medium onion (finely chopped)
  • 3 tbsp olive oil
  • 3 garlic cloves (minced)
  • 1 tsp ground paprika
  • 1/2 tsp ground cumin
  • 1/4 tsp cayenne pepper (optional)
  • 1 tsp turmeric
  • 1/4 cup (60ml) fresh parsley (chopped)
  • 1/4 cup (60ml) fresh cilantro (chopped)
  • Salt and pepper (to taste)

For the Sauce:

  • 1 cup (240ml) fish stock (or water)
  • 1/2 cup (120ml) heavy cream
  • 2 tbsp butter
  • 2 tbsp all-purpose flour

For the Pastilla Layers:

  • 8–10 sheets of phyllo dough (or warqa if available)
  • 1/4 cup (60g) melted butter (for brushing)

For Garnish:

  • Sliced almonds (toasted)
  • Powdered sugar and ground cinnamon (optional, for a sweet touch)

Instructions

1. Prepare the Seafood Filling:

  1. Heat olive oil in a large skillet over medium heat. Add the onions and garlic, and sauté until softened and fragrant.
  2. Add the shrimp, fish, and squid. Cook for 5–7 minutes until the seafood is just cooked.
  3. Stir in paprika, cumin, turmeric, cayenne (if using), parsley, and cilantro. Season with salt and pepper. Remove from heat and let the filling cool slightly.

2. Make the Sauce:

  1. In a saucepan, melt butter over medium heat. Stir in the flour and cook for 1–2 minutes to form a roux.
  2. Gradually whisk in the fish stock and heavy cream, cooking until the sauce thickens.
  3. Mix the sauce into the cooled seafood mixture. Set aside.

3. Assemble the Pastilla:

  1. Preheat the oven to 375°F (190°C).
  2. Grease a round baking dish or springform pan.
  3. Lay a sheet of phyllo dough (or warqa) in the dish, letting the edges hang over the sides. Brush with melted butter. Repeat with 4–5 more sheets, layering and buttering each one.
  4. Spread the seafood filling evenly over the dough. Fold the overhanging dough over the filling, brushing with butter as you go.
  5. Cover the top with additional phyllo sheets, tucking in the edges and brushing with butter.

4. Bake the Pastilla:

  1. Place the pastilla in the oven and bake for 25–30 minutes, or until golden and crisp.
  2. Let it cool for a few minutes before removing it from the pan.

5. Garnish and Serve:

  • Sprinkle with toasted almonds.
  • For a traditional Moroccan touch, dust the top with powdered sugar and cinnamon for a mix of sweet and savory flavors.

Tips:

  • Warqa Alternative: If using warqa (traditional Moroccan pastry), follow the same assembly steps.
  • Make Ahead: The seafood filling can be prepared a day ahead and stored in the refrigerator.
  • Serving Suggestion: Pair the pastilla with a fresh green salad or Moroccan mint tea.

Enjoy your Moroccan seafood pastilla—a dish that’s crispy, creamy, and bursting with flavor! 🦐🥮

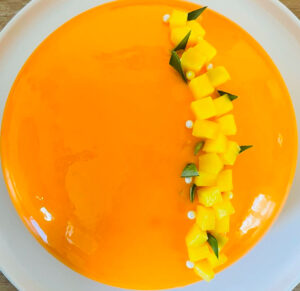
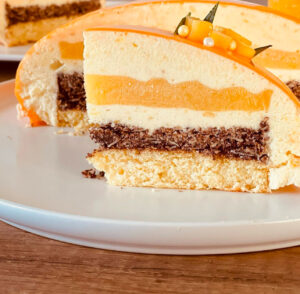
Mango Fruit Cake

Mango Fruit Cake Recipe

This mango fruit cake is a tropical delight! Bursting with fresh mango flavor and balanced with the fluffiness of a sponge cake, it’s perfect for summer gatherings or any special occasion. 🍰🥭


Ingredients

For the Cake Batter:

  • 2 cups (250g) all-purpose flour
  • 1 1/2 tsp baking powder
  • 1/2 tsp baking soda
  • 1/4 tsp salt
  • 1 cup (240ml) fresh mango puree (from 2 ripe mangoes)
     
  • 3/4 cup (150g) granulated sugar
  • 1/2 cup (120ml) vegetable oil or melted butter

  • 2 large eggs (room temperature)
  • 1 tsp vanilla extract

For the Mango Glaze (Optional):

  • 1/2 cup fresh mango puree
  • 2 tbsp powdered sugar
  • 1 tsp lemon juice

For Decoration:

  • Fresh mango slices
  • Whipped cream or cream cheese frosting (optional)
  • Fresh mint leaves (optional)

Instructions

1. Prepare the Cake Pan:

  • Preheat your oven to 350°F (175°C).
  • Grease and line an 8-inch (20cm) round cake pan with parchment paper.

2. Mix the Dry Ingredients:

  • In a bowl, whisk together the all-purpose flour, baking powder, baking soda, and salt.

3. Blend the Wet Ingredients:

  • In a separate large bowl, combine the mango puree, sugar, oil, eggs, and vanilla extract. Whisk until smooth and well combined.

4. Combine Wet and Dry Ingredients:

  • Gradually fold the dry ingredients into the wet mixture. Mix gently until just combined; avoid overmixing to keep the cake fluffy.

5. Bake the Cake:

  • Pour the batter into the prepared cake pan and smooth the top.
  • Bake for 30–35 minutes or until a toothpick inserted into the center comes out clean.
  • Let the cake cool in the pan for 10 minutes, then transfer to a wire rack to cool completely.

6. Make the Mango Glaze (Optional):

  • In a small saucepan, combine the mango puree, powdered sugar, and lemon juice.
  • Cook over low heat for 3–5 minutes, stirring, until slightly thickened. Allow to cool before spreading on the cake.


7. Decorate the Cake:

  • Spread the mango glaze (if using) evenly over the cooled cake.
  • Garnish with fresh mango slices, whipped cream, or cream cheese frosting. Add mint leaves for a fresh touch.

Tips:

  • Mango Variety: Use ripe and sweet mangoes like Alphonso or Ataulfo for the best flavor.
  • Storing: Store the cake in an airtight container in the refrigerator for up to 3 days.
  • Add-Ins: For extra texture, fold in chopped nuts or dried fruits like raisins into the batter.

Enjoy this moist, fruity, and tropical mango cake! 🥭🍰

Triple Chocolate Mousse Cake

Triple Chocolate Mousse Cake Recipe

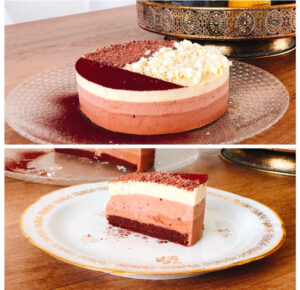
This luxurious dessert combines layers of milk, dark, and white chocolate mousse over a rich chocolate base. It’s the ultimate treat for chocolate lovers! 🍫✨


Ingredients

For the Base:

  • 200g chocolate cookies (crushed into fine crumbs)
  • 75g unsalted butter (melted)

For the Milk Chocolate Mousse:

  • 150g milk chocolate (chopped)
  • 1 cup (240ml) heavy cream (divided)
  • 1 tsp gelatin powder
  • 2 tbsp water

For the Dark Chocolate Mousse:

  • 150g dark chocolate (chopped)
  • 1 cup (240ml) heavy cream (divided)
  • 1 tsp gelatin powder
  • 2 tbsp water

For the White Chocolate Mousse:

  • 150g white chocolate (chopped)
  • 1 cup (240ml) heavy cream (divided)
  • 1 tsp gelatin powder
  • 2 tbsp water

Optional Garnishes:

  • Chocolate curls or shavings
  • Cocoa powder for dusting
  • Fresh berries

Instructions

1. Prepare the Base:

  1. Line the bottom of a springform pan (8-inch/20cm) with parchment paper.
  2. In a bowl, mix the crushed cookies with melted butter until well combined.
  3. Press the mixture into the bottom of the pan to form a firm, even layer. Refrigerate while preparing the mousse layers.

2. Make the Milk Chocolate Mousse:

  1. Dissolve the gelatin: In a small bowl, sprinkle gelatin over 2 tbsp water and let it bloom for 5 minutes.
  2. Melt the chocolate: In a heatproof bowl, melt milk chocolate using a microwave or a double boiler. Let it cool slightly.
  3. Whip the cream: Whip 3/4 cup heavy cream to soft peaks. Set aside.
  4. Heat remaining cream: Warm 1/4 cup heavy cream, then stir in the bloomed gelatin until fully dissolved.
  5. Combine: Mix the melted chocolate with the cream-gelatin mixture, then gently fold in the whipped cream until smooth. Spread over the cookie base and refrigerate for 30 minutes.

3. Make the Dark Chocolate Mousse:
Repeat the same process as above using dark chocolate. Pour the mousse layer over the milk chocolate mousse, spreading evenly. Refrigerate for another 30 minutes.


4. Make the White Chocolate Mousse:
Repeat the process again using white chocolate. Pour the final mousse layer over the dark chocolate mousse, smoothing the top. Refrigerate the entire cake for at least 4–6 hours or until fully set.


5. Remove from Pan & Garnish:

  1. Run a knife around the edges of the springform pan to release the cake. Gently remove the ring.
  2. Decorate the top with chocolate curls, shavings, or a dusting of cocoa powder.

Tips:

  • Make Ahead: This cake can be prepared a day in advance and stored in the refrigerator.
  • Cutting Clean Slices: Use a warm knife (dip in hot water, then wipe dry) to slice through the mousse layers.
  • Custom Layers: Swap milk or dark chocolate for a flavored chocolate like caramel or hazelnut for a twist.

Enjoy this decadent and show-stopping Triple Chocolate Mousse Cake! 🍫🎂

Easy Closed Burger

Easy Closed Burger Recipe

This simple and delicious closed burger is perfect for a quick meal. Juicy patties, fresh toppings, and a soft bun make it irresistible! 🍔


Ingredients:

For the Burger Patties:

  • 500g ground beef (80/20 lean-to-fat ratio for juicy burgers)
  • 1/2 tsp salt
  • 1/2 tsp black pepper
  • 1 tsp garlic powder
  • 1 tsp onion powder
  • 1 tbsp Worcestershire sauce (optional)

For the Toppings:

  • 4 slices of cheddar cheese
  • Lettuce leaves
  • Tomato slices
  • Onion slices (raw or caramelized)
  • Pickles (optional)

For the Sauce (optional):

  • 3 tbsp mayonnaise
  • 1 tbsp ketchup
  • 1 tsp mustard

Other Ingredients:

  • 4 burger buns (soft and fresh)
  • 1 tbsp butter or oil for cooking

Instructions:

1. Prepare the Patties:

  • In a bowl, combine the ground beef, salt, black pepper, garlic powder, onion powder, and Worcestershire sauce (if using). Mix gently until just combined; avoid overmixing to keep the patties tender.
  • Divide the mixture into 4 equal portions and shape them into round patties slightly larger than the burger buns (they will shrink while cooking).

2. Cook the Patties:

  • Heat a skillet or grill pan over medium-high heat. Add a little butter or oil.
  • Place the patties on the hot skillet and cook for 3–4 minutes on each side for medium doneness, or longer if you prefer well-done.
  • During the last minute of cooking, place a slice of cheese on each patty and cover the pan with a lid to melt the cheese.

3. Toast the Buns:

  • Slice the burger buns in half and lightly toast them in a dry pan or on the grill for about 1–2 minutes until golden and warm.

4. Assemble the Burgers:

  • Spread the sauce (if using) on the bottom half of the bun.
  • Layer with lettuce, a cheese-topped patty, tomato slices, onion slices, and pickles.
  • Add the top half of the bun to close the burger.

5. Serve:

  • Serve the closed burgers immediately with your favorite side dishes like fries, coleslaw, or a fresh salad.

Tips:

  • Customize the Toppings: Add bacon, avocado, or even a fried egg for a gourmet twist.
  • Make It Healthier: Use whole-grain buns and substitute beef with turkey or plant-based patties.
  • Meal Prep: Shape the patties in advance and freeze them for quick meals later.

Enjoy your easy and mouthwatering closed burger! 🍔✨

Vegetarian Quiche recipe

Vegetarian Quiche Recipe

This vegetarian quiche is packed with fresh vegetables, creamy custard, and cheesy goodness in a buttery crust. Perfect for breakfast, brunch, or a light dinner!


Ingredients:

For the Crust:

  • 1 1/4 cups (160g) all-purpose flour
  • 1/2 cup (115g) cold unsalted butter, cubed
  • 1/4 tsp salt
  • 3–4 tbsp cold water

For the Filling:

  • 1 tbsp olive oil
  • 1 small onion, finely chopped
  • 2 cups (200g) mixed vegetables (e.g., bell peppers, spinach, mushrooms, zucchini)
  • 1/2 cup (60g) shredded cheddar cheese or Gruyere cheese
  • 4 large eggs
  • 1 cup (240ml) heavy cream or milk (or a mix of both)
  • 1/4 tsp salt
  • 1/4 tsp black pepper
  • 1/4 tsp ground nutmeg (optional)

Instructions:

1. Prepare the Crust:

  • In a large bowl, combine the flour and salt. Add the cold butter and use a pastry cutter or your fingers to work the butter into the flour until the mixture resembles coarse crumbs.
  • Gradually add the cold water, one tablespoon at a time, mixing until the dough comes together. Shape it into a disk, wrap it in plastic wrap, and chill for at least 30 minutes.
  • Preheat your oven to 375°F (190°C). Roll out the chilled dough on a lightly floured surface to fit a 9-inch (23cm) tart pan or pie dish. Press the dough into the pan and trim the edges. Prick the bottom with a fork.
  • Line the crust with parchment paper and fill with pie weights or dried beans. Bake for 10 minutes, then remove the weights and bake for another 5 minutes. Set aside to cool slightly.

2. Prepare the Filling:

  • Heat the olive oil in a skillet over medium heat. Add the chopped onion and cook until soft and translucent, about 3 minutes.
  • Add the mixed vegetables and cook until tender, about 5–7 minutes. Remove from heat and set aside to cool.

3. Make the Custard:

  • In a mixing bowl, whisk together the eggs, cream/milk, salt, pepper, and nutmeg (if using).

4. Assemble the Quiche:

  • Sprinkle half of the shredded cheese over the bottom of the pre-baked crust.
  • Evenly distribute the cooked vegetables over the cheese.
  • Pour the custard mixture over the vegetables, then sprinkle the remaining cheese on top.

5. Bake the Quiche:

  • Place the quiche in the preheated oven and bake for 30–35 minutes, or until the custard is set and the top is lightly golden. The center should jiggle slightly when shaken but not be liquid.

6. Cool and Serve:

  • Allow the quiche to cool for at least 10 minutes before slicing. Serve warm or at room temperature.

Tips:

  • Vegetable Options: Use your favorite vegetables, such as asparagus, broccoli, or roasted cherry tomatoes.
  • Cheese Variations: Try feta, goat cheese, or mozzarella for a different flavor.
  • Make Ahead: The crust can be made and chilled up to a day in advance, and the quiche can be stored in the fridge for up to 3 days.

Enjoy this versatile and delicious vegetarian quiche with a side salad or on its own! 🥧✨

Carrote Cake Recipe

Carrot Cake Recipe

This moist and spiced carrot cake is a classic dessert loved by everyone. Topped with creamy cream cheese frosting, it’s perfect for any occasion!


Ingredients:

For the Cake:

  • 2 cups (250g) all-purpose flour
  • 1 1/2 tsp baking powder
  • 1 tsp baking soda
  • 1/2 tsp salt
  • 1 tsp ground cinnamon
  • 1/2 tsp ground nutmeg
  • 1/4 tsp ground ginger
  • 1 cup (200g) granulated sugar
  • 1/2 cup (100g) brown sugar
  • 1 cup (240ml) vegetable oil
  • 4 large eggs
  • 2 tsp vanilla extract
  • 2 cups (200g) grated carrots (about 3 medium carrots)
  • 1/2 cup (50g) chopped walnuts or pecans (optional)
  • 1/2 cup (75g) raisins (optional)

For the Cream Cheese Frosting:

  • 8 oz (225g) cream cheese, softened
  • 1/2 cup (115g) unsalted butter, softened
  • 2 cups (250g) powdered sugar, sifted
  • 1 tsp vanilla extract

Instructions:

1. Preheat the Oven:

  • Preheat your oven to 350°F (175°C). Grease and flour two 8-inch (20cm) round cake pans or a 9×13-inch (23x33cm) baking pan.

2. Prepare the Cake Batter:

  • In a medium bowl, whisk together the flour, baking powder, baking soda, salt, cinnamon, nutmeg, and ginger. Set aside.
  • In a large mixing bowl, combine the granulated sugar, brown sugar, and vegetable oil. Mix until smooth.
  • Add the eggs one at a time, beating well after each addition. Stir in the vanilla extract.
  • Gradually add the dry ingredients to the wet ingredients, mixing until just combined.
  • Fold in the grated carrots, nuts, and raisins (if using).

3. Bake the Cake:

  • Divide the batter evenly between the prepared cake pans, or pour it into the 9×13-inch pan. Smooth the top with a spatula.
  • Bake for 25–30 minutes (for round pans) or 35–40 minutes (for a single pan), or until a toothpick inserted in the center comes out clean.
  • Let the cake cool in the pans for 10 minutes, then transfer to a wire rack to cool completely.

4. Make the Cream Cheese Frosting:

  • In a large bowl, beat the cream cheese and butter together until smooth and creamy.
  • Gradually add the powdered sugar, beating until well combined and fluffy. Stir in the vanilla extract.

5. Assemble the Cake:

  • If making a layer cake, place one layer on a serving plate and spread a layer of frosting on top. Place the second layer on top and frost the top and sides of the cake.
  • For a single-layer cake, simply spread the frosting evenly over the top.

6. Decorate and Serve:

  • Garnish with additional chopped nuts, grated carrots, or a light dusting of cinnamon if desired.
  • Slice and enjoy!

Tips:

  • Make Ahead: The cake can be baked a day in advance and stored, unfrosted, in an airtight container. Frost just before serving.
  • Storage: Store the cake in the refrigerator for up to 5 days. Bring to room temperature before serving.
  • Freezing: You can freeze the unfrosted cake layers for up to 2 months. Thaw in the fridge before frosting.

Enjoy this timeless carrot cake—it’s sure to be a crowd-pleaser! 🥕✨

Morrocan Chicken Samossa

Moroccan Chicken Samosa Recipe

This Moroccan-style samosa recipe combines spiced minced chicken, aromatic herbs, and crispy pastry to create a delicious appetizer or snack. Perfect for parties or as a side dish!


Ingredients:

For the Filling:

  • 1 lb (450g) ground chicken
  • 1 medium onion, finely chopped
  • 2 garlic cloves, minced
  • 1 tbsp olive oil
  • 1 tsp ground cumin
  • 1 tsp ground coriander
  • 1/2 tsp ground cinnamon
  • 1/2 tsp paprika
  • 1/4 tsp cayenne pepper (optional, for heat)
  • 1/4 cup (15g) chopped fresh parsley
  • 1/4 cup (15g) chopped fresh cilantro
  • Salt and pepper to taste
  • Juice of 1/2 lemon

For the Pastry:

  • 10–12 spring roll sheets or phyllo dough (cut into strips)
  • 3 tbsp melted butter or oil (for brushing the pastry)
  • 1 egg (lightly beaten, for sealing edges)

For Frying:

  • Vegetable oil (for deep frying)

Instructions:

  1. Prepare the Filling:
    • Heat 1 tablespoon of olive oil in a skillet over medium heat. Add the chopped onion and sauté until soft and translucent, about 5 minutes.
    • Add the minced garlic and cook for another minute until fragrant.
    • Add the ground chicken and cook until browned, breaking it up into small pieces with a spoon.
    • Stir in cumin, coriander, cinnamon, paprika, and cayenne pepper. Cook for 2–3 minutes to toast the spices and develop their flavors.
    • Season with salt, pepper, and a squeeze of lemon juice. Stir in the chopped parsley and cilantro, then set aside to cool completely.
  2. Assemble the Samosas:
    • Take one strip of spring roll sheet or phyllo dough. Place a small spoonful of the chicken filling at one end.
    • Fold the pastry into a triangular shape, enclosing the filling. Continue folding into a triangle until you reach the end of the strip.
    • Seal the edge with a little beaten egg to prevent it from opening while frying. Repeat for the remaining sheets and filling.
  3. Cook the Samosas:
    • Deep Frying: Heat vegetable oil in a deep pan to 350°F (180°C). Fry the samosas in batches until golden brown and crispy, about 3–4 minutes per side. Drain on paper towels.
    • Baking (Healthier Option): Preheat your oven to 375°F (190°C). Place the samosas on a baking sheet lined with parchment paper. Brush them with melted butter or oil and bake for 20–25 minutes, turning once, until golden and crispy.
  4. Serve:
    • Serve the samosas warm with mint yogurt sauce, harissa, or a side of lemon wedges.

Tips:

  • Customizations: Add a handful of chopped vegetables (e.g., carrots, peas, or spinach) to the filling for extra texture.
  • Pastry Alternatives: If spring roll sheets aren’t available, you can use puff pastry, shortcrust pastry, or wonton wrappers.
  • Storage: Uncooked samosas can be frozen and fried directly from frozen when needed.

Enjoy the crispy, flavorful goodness of Moroccan chicken samosas! 🥟✨